
Backing Up Your Windows Files

1) Double-click on the My Computer icon located on your desktop. My Computer can also be accessed by clicking on the Start button and looking in the second column of the menu. The icon looks like this:
2) Resize the window so you can see your desktop and the My Computer window. To resize a window, left-click on the lower right-hand corner of the window. While holding the mouse down, move your mouse diagonally. When the screen is the size you want, release the mouse.
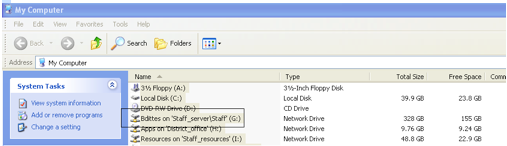
3) Double-click on your username in the list displayed in the My Computer window to open your network folder. This link is also known as the G drive.
3) Double-click on your username in the list displayed in the My Computer window to open your network folder. This link is also known as the G drive.
4) Back on your computer, select the files you want to copy to the server. There are several ways to select files on your computer: First, navigate to the folder in which you have been saving your files (if not the Desktop). Then:
6) Switch to your network folder
7) Right-click and select “Paste”. The files you copied should be displayed in the network folder.
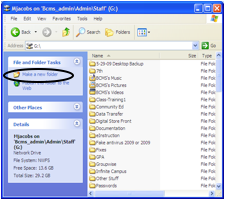
8) To organize your files on the network share, it may make sense to create several subfolders. To do so, click on Make a New Folder as depicted in the screenshot below. On the right-hand side of the screen, a new icon called “New Folder” will appear and in the text field, you can enter the name of your folder.
- To select a consecutive group of files or folders in a list, click the first item, press and hold down the Shift key, and then click the last item
- To select multiple files or folders that are near each other, such as on your desktop, hold down the left button and drag the mouse pointer to create a selection around the items you want to include.
- Release the mouse when you have the files you want selected.
- To select non-consecutive files or folders, press and hold down the Ctrl key and then click on each item that you want to select
6) Switch to your network folder
7) Right-click and select “Paste”. The files you copied should be displayed in the network folder.
8) To organize your files on the network share, it may make sense to create several subfolders. To do so, click on Make a New Folder as depicted in the screenshot below. On the right-hand side of the screen, a new icon called “New Folder” will appear and in the text field, you can enter the name of your folder.
A Tip:
You may want to check where some of your specific programs save their files. Sometimes, the files are saved on the local computer regardless of any settings you make.
For instance… One of our users has Adobe PhotoShop Elements installed on her computer. By default, the pictures from that application are saved to the My Pictures folder, which is a subfolder of the My Documents folder. You will want to ensure that you back up those files to the network.
