
Common Mac Terms
You don’t need to learn complicated technical terms to communicate with your Mac. Here’s a guide to some common Mac terms. To look up additional terms, open the Dictionary app, choose Apple Dictionary, and then type in the search field.
Open Dictionary
Open Dictionary
Desktop and Windows
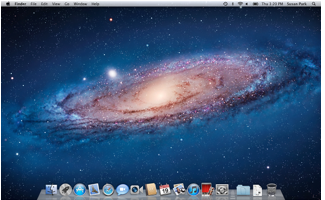
The desktop is the background area of your Mac’s screen. When you first get your Mac, there’s only one icon on the desktop—for your Mac’s internal disk. But you can add what you want to the desktop: create folders, store files, and add icons for frequently used items. The desktop is your main work space on the Mac, and—like a real desktop—you can organize items on it so they’re convenient for you.
Most of the work you do on the desktop is in windows—either Finder windows or windows for apps you use, such as Mail or the Safari web browser. Many apps also have a full-screen view that lets you expand the current window to use the entire screen.
You can organize and customize windows and the desktop to create a comfortable working environment.
Change your desktop picture
Finder
You use the Finder to find and organize your files, folders, and apps. The Finder organizes and displays the files and folders on your computer and on any disks connected to your computer. The Finder also lets you search and manage all your information.
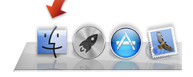
To open a Finder window, click the desktop and choose File > New Finder Window, or click the Finder icon (smiling face) in the Dock.
Customize Finder windows
Choose options for viewing items in Finder windows
Finder preferences
To open a Finder window, click the desktop and choose File > New Finder Window, or click the Finder icon (smiling face) in the Dock.
Customize Finder windows
Choose options for viewing items in Finder windows
Finder preferences
Dock

The Dock contains icons for apps, such as Mail, that you may use frequently. By default, the Dock is at the bottom of the screen, but you can move it to either side of the screen, and customize it in other ways. To open an app in the Dock, click its icon.
To see folders and files on your computer, click the Finder icon (smiling face) in the Dock. For quick access to all your apps, including ones that aren’t in the Dock, click the Launchpad icon (next to the Finder icon).
Customize the Dock
To see folders and files on your computer, click the Finder icon (smiling face) in the Dock. For quick access to all your apps, including ones that aren’t in the Dock, click the Launchpad icon (next to the Finder icon).
Customize the Dock
Launchpad
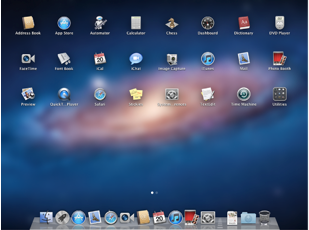
Launchpad gives you instant access to your apps, iPad style. Just click the Launchpad icon in your Dock. Your open windows fade away, replaced by an elegant, full-screen display of all the apps on your Mac.
To see additional pages of apps, swipe or press the arrow keys. You can arrange your apps any way you like by dragging icons or by grouping apps in folders. When you download an app from the Mac App Store, it automatically appears in Launchpad.
Apps included with your Mac
To see additional pages of apps, swipe or press the arrow keys. You can arrange your apps any way you like by dragging icons or by grouping apps in folders. When you download an app from the Mac App Store, it automatically appears in Launchpad.
Apps included with your Mac
Menu Bar

At the top of your screen is the menu bar, which contains many of the menus and commands you use to work with your files, folders, and apps. The leftmost menu is the Apple menu, designated by an Apple icon. When you are in the Finder, you’ll see the Finder menu next to the Apple menu. When you use other applications, their menus may appear here instead.
You can click the desktop at any time to get back to the Finder and see the Finder menu.
What’s in the menu bar?
You can click the desktop at any time to get back to the Finder and see the Finder menu.
What’s in the menu bar?
Apple Menu
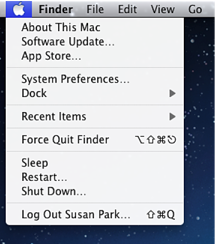
The Apple menu, which contains frequently used items, is located in the upper-left corner of your screen. To open it, click the Apple icon.
What’s in the Apple menu?
What’s in the Apple menu?
All My Files
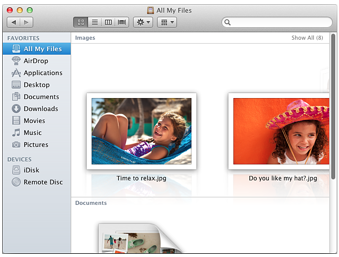
All My Files, which you can access from the Finder sidebar or the Dock, gives you a quick, efficient way to browse through your files and folders.
Open a Finder window and click All My Files to see all the text documents, PDFs, images, and other types of documents on your computer. Or, click All My Files in the Dock.
To change how the documents are grouped, click the item arrangement button.
You can organize documents by kind, size, or application, or sort them so the ones you’ve worked on most recently are the at the top. You can also create custom labels for your documents, and then group by label.
Choose options for viewing items in Finder windows
Trash

To remove an item, drag it to the Trash. The Trash is located at the end of the Dock.
If you change your mind, click the Trash icon to open it, and then drag the item out of the Trash or select the item and choose File > Put Back.
Remove files and folders from your computer
If you change your mind, click the Trash icon to open it, and then drag the item out of the Trash or select the item and choose File > Put Back.
Remove files and folders from your computer
Spotlight
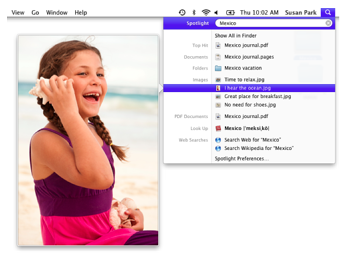
Spotlight lets you find almost anything on your computer, including documents, photos, music, email messages, iCal events, and more.
Spotlight searches both the names and contents of all your files, so if you search for “Tom,” you’ll find photos named “Tom,” Tom’s contact info, documents that contain the word “Tom,” and email messages from Tom—you’ll even find webpages you’ve visited recently that mention “Tom.”
To begin a Spotlight search, click the Spotlight icon in the top-right corner of the screen, and then type a word or phrase. To search for an exact phrase, enclose it in quotation marks.
Find anything on your Mac
Mission Control, Spaces, and Exposé
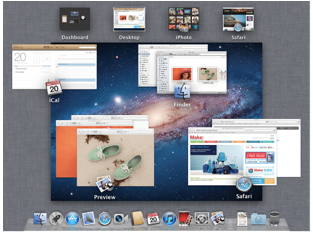
Mission Control and Exposé give you a comprehensive look at what’s running on your Mac. You have a bird’s-eye view of everything, including Dashboard and full-screen apps, all in one place. You can see every window in every space, move files and folders around, and choose the window, space, or widget you want to use.
If desktop clutter is getting the best of you, use the Spaces feature to work in multiple desktops. You might want to keep all your work projects in one space, and games in another. Or you might want to create an individual space for each project. For maximum clutter control, use Spaces together with Mission Control and Exposé.
See everything running on your Mac
Work in multiple spaces
Dashboard and Widgets
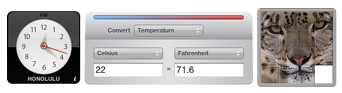
Dashboard contains a collection of handy “widgets”: small apps that let you quickly do a wide variety of tasks such as checking stock prices, finding local or global weather information, looking up words in the dictionary, and more.
Some widgets are linked to larger applications. With the Address Book widget, for example, you can search for a name and address without opening the full Address Book application. Other widgets, such as Weather, provide web-based information without opening a web browser.
Get quick information with widgets
Alias

To make it easier to access a disk, app, file, or folder, you can create an alias for it and place the alias in an easy-to-find location. An alias has no content of its own; it just points to a document, folder, application, or device. When you double-click the alias, the item it points to opens or starts up.
An alias has the same icon as the original item, with a curved arrow in one corner.
You can make as many aliases as you like for items you use frequently, and put the aliases in convenient places such as the desktop. To create an alias, select an item in the Finder and choose File > Make Alias. Or, drag an item into the Dock or Finder sidebar—an alias is created automatically.
All the items in the Dock and Finder window sidebar are aliases. It’s OK to remove them if you don’t need them—if you delete an alias, the item it points to is not affected.
Create and use aliases
System Preferences
Use System Preferences to set or change many system-wide settings for your computer, such as the date and time, the way your keyboard and mouse work, and your network settings.
To make changes in your preferences, click the System Preferences icon in the Dock, and then click the icon for the settings you want to change. If the settings are dimmed and the lock icon is locked, click the icon and type the name and password of an administrator for the computer. (The first user you set up is an administrator.)
Change your computer’s settings
Find settings in System Preferences
Sleep
You can set your computer, or just your display, to sleep automatically when it’s inactive for a period of time. Sleep is a low-power state that saves energy.
To set up sleep and other energy-saving options, choose Apple menu > System Preferences and click Energy Saver. To put your computer to sleep immediately, choose Apple menu > Sleep.
To wake your computer up, move the pointer or press any key.
Log out, sleep, and shut down
To set up sleep and other energy-saving options, choose Apple menu > System Preferences and click Energy Saver. To put your computer to sleep immediately, choose Apple menu > Sleep.
To wake your computer up, move the pointer or press any key.
Log out, sleep, and shut down
Special Keys
Menu commands often have keyboard shortcuts listed in the menus. For example, the File menu in the Finder lists the keyboard shortcut ⌘I (Command-I) for Get Info.
You can discover additional menu commands and keyboard shortcuts by opening a menu and pressing the ⌥ (Option) and ⇧ (Shift) keys. For example, if you press the Option key while the File menu is open, the Get Info command changes to Show Inspector, which has the keyboard shortcut ⌥⌘I (Option-Command-I).
You can change or disable many of the “global” keyboard shortcuts (shortcuts that work for all applications) on your computer. You can also create keyboard shortcuts for applications.
Use global keyboard shortcuts
Create keyboard shortcuts for applications
Save time with keyboard shortcuts
