
Trouble Shooting your Projector
Using your Ceiling-Mounted Projector
If this is the first time using the ceiling-mounted projector in your classroom, please check to make sure that the projector has cords coming out of the back of it and connected to the outlets in the ceiling. There should be audio and video cables connected as well as a power cord. If this isn't the case, contact TIS Support at 2HELP if it is urgent or else email [email protected]
Next, make sure your computer is hooked up to the wall connection in your classroom.
If you have a desktop computer, the connection should already be set up, including audio and splitting the video. If this is not the case, contact a TIS Support person at 2HELP if it is urgent or else email [email protected].
If you have a laptop, locate the drop in your room (see the picture below) and connect your computer to the wall unit using your VGA cable. To run your audio to the projector, plug one end of the audio cable into your laptop's headphone jack and the other end into the single hole in the unit.

Make sure your projector is turned on. Use the power button on your remote. You can also use the power button on the bottom of your Voice Amplification System Remote, if you have one.
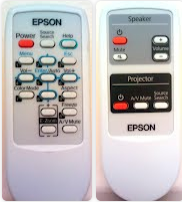
If no light is coming from your projector after it warms up, slide the A/V mute to the open position. The A/V mute is above the power button. You should be able to see the focus and W/T controls.
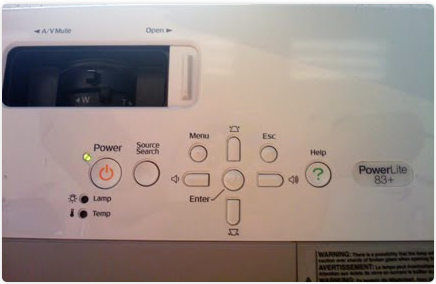
To adjust your image's focus or projection size, twist the two dials that are under the A/V mute slide on your projector. This should not have to be done often. Once your image is focused, you should be ready for a long time. You do not have to worry about sliding the A/V mute closed again.
Troubleshooting your Projector
Before doing any trouble shooting, please make sure that your projector is properly connected, especially if this is the first time you are using your computer. Check the back of your projector and see if it has cables connected to it. If you are missing cables, contact TIS Support at 2HELP or [email protected].
If the projector is on, the A/V slider is open, and the image on your screen is still black:
If the projector is projecting a blue screen and the words "No Signal" are on the bottom left:
If the projector is on, the A/V slider is open, and the image on your screen is still black:
- Double check to make sure that the VGA cable is firmly plugged into both the computer and your wall drop.
- Try pressing the "A/V Mute" button on the remote. If that was the problem, the image should immediately appear.
- Try pressing the "Freeze" button on your remote. There may be an image frozen on the projector.
- If this is one of the the first times using your projector, and you've tried the two steps above, contact 2HELP or [email protected]. There may be a problem with the wiring in your classroom. To test this yourself, you can try connecting your computer directly to the back of the projector.
If the projector is projecting a blue screen and the words "No Signal" are on the bottom left:
- Double check to make sure that the VGA cable is firmly plugged into both the computer and your wall drop.
- Press the "Source Search" button on the projector or the "Source" button on your remote.
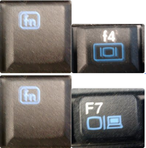
- If that doesn't work, and if you are on a PC, try adjusting your output preferences. On a school-issued HP machine, hold down Function (Fn) and press the F4 key. (See below for pictures) On a school-issued Lenovo machine, hold down Function (Fn) and press the F7 key. You may have to press this several times to cycle through different projector options. If this button works, press the keys until you see the same (or similar) image on both your computer and your projected display.
- If you are on a Mac, click the monitor icon on the top bar near the time and date. Then select "Detect Displays".

If the projector is projecting a blue screen and the words "Not Supported" are on the bottom left:
- Double check to make sure that the VGA cable is firmly plugged into both the computer and your wall drop.
- If you are on a PC, you probably need to adjust your Screen Resolution. Follow the following steps.
- Right click on your desktop and select "Properties"
- In the new window that pops up, select the "Settings" tab on the far right.
- Drag the screen resolution slider toward the left. Try the far left setting first.
- Click "Apply" and see if the problem is resolved. If your image is still not projecting, cancel that change.
- If you are on a Mac, click the monitor icon on the top bar near the time and date. Then select "Detect Displays".
- If none of the above steps work, contact 2HELP or email [email protected]. Let them know if this is the first time using your projector, because there may be a wiring issue.
- If you are on a Mac, chances are that you have dual displays turned on. This lets you use your computer screen for one purpose and the projector for another. For example, you can have GroupWise and Infinite Campus on your screen and your SMARTBoard or a video clip being projected. To move a desired program to your projector display, simply click and drag it off of your monitor display to the left or right.
- If you want to turn this feature off, open your Display Preferences by clicking the monitor icon on the top of your screen and selecting "Display Preferences" and adjust your settings.
- This may also be the case on certain PC models. Attempt the above solution. If that doesn't work, and you're using a PC, try adjusting your output preferences. On a school-issued HP machine, hold down Function (Fn) and press the F4 key. On a school-issued Lenovo machine, hold down Function (Fn) and press the F7 key (See below for pictures). You may have to press this several times to cycle through different projector options. If this button works, press the keys until you see the same (or similar) image on both your computer and your projected display.
- If neither of these solutions work, please contact TIS Support by calling 2HELP or emailing [email protected].
The projected image is upside down.
- You can easily flip the image on your display. Make sure you're using the projector remote (not the audio system remote).
- Select "Menu"
- Go to "Extended" and press Enter.
- Select "Projection"
- Select "Front/Ceiling"
- Exit the menu and your image should now be projecting correctly.
The image appears to skinny on top or on the bottom
- This issue can be fixed by adjusting the Keystone settings on your projector. You can either find the Keystone button on the top of the actual projector unit or adjust them in the menu of your projector.
- Using your projector remote, select "Menu".
- Select "Settings" and press Enter
- Select "Keystone" and press Enter
- Adjust the Keystone setting until your image appears acceptable.
- Exit the menu.
My picture is crooked, aimed incorrectly, or keystone settings can't fix a pinched picture.
- Contact TIS Support. Your projector installation may need to be adjusted. Call 2HELP if it is urgent or email [email protected]
I'm not hearing any audio coming from the projector.
- First, make sure your computer has an audio cable coming from the headphone jack and running to the wall connection.
- Next, make sure your projector has an audio cable connected to the back in the same input as your VGA cable.
- Check to make sure your computer is not on mute or that the volume isn't nearly all the way down.
- Finally, use your remote to adjust the volume on your projector.
- If you have done all of these things and audio is still not working, contact TIS Support at 2HELP or [email protected].
- First, make sure that your other source is plugged into the wall drop and that the appropriate cords are also connected to the back of your projector.
- Turn on your device and then press the "Source Search" button on your remote or on the back of the projector. The projector should automatically discover your new device.
- Once you are done, press "Source Search" again and the projector will find your computer.
