
Voice Amplification System
Before you begin
Please make sure to safely visually inspect your setup before you begin using your Voice Amplification System and Projector.
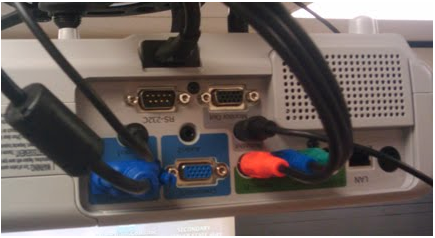
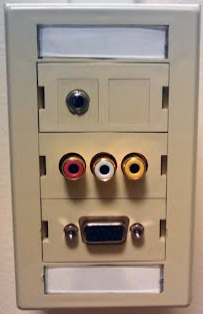
Look at the two pictures below and make sure your system closely matches them. If your system is correctly plugged in, the back of your projector should look like this:
Please make sure to safely visually inspect your setup before you begin using your Voice Amplification System and Projector.
Look at the two pictures below and make sure your system closely matches them. If your system is correctly plugged in, the back of your projector should look like this:
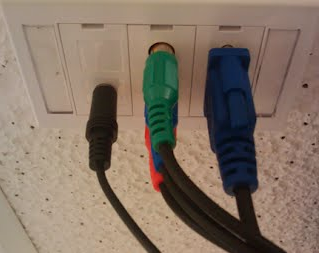
And your ceiling plug should look like this:
Getting started:
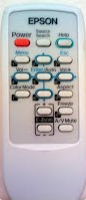
When you enter your room, turn on your Voice Amplification System with this remote. Use top power button to turn on your speakers. Use the bottom power button to turn on your projector if you will be using your projector in addition to your speakers. The speakers are located above your projector on your ceiling.
When you enter your room, turn on your Voice Amplification System with this remote. Use top power button to turn on your speakers. Use the bottom power button to turn on your projector if you will be using your projector in addition to your speakers. The speakers are located above your projector on your ceiling.
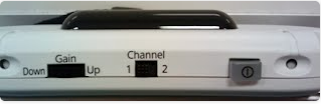
Put on your wireless mic and turn it on with the power button. It should be on Channel 1 (both on the speaker unit and on your mic).
If you do not hear anything from your speakers once your mic is turned on, check to make sure that the switch on your ceiling speakers is turned on and that there is a green light next to the on switch. See the picture below for an illustration of a system that is working properly.
If you are having feedback issues (screeching sounds from your speaker), turn down the gain on your mic unit. If the feedback issues persist or you cannot find a comfortable volume through your speakers, you need to adjust the controls on your actual speaker unit. Be sure you feel comfortable making these adjustments and you are reaching the controls safely. A building custodian or TIS Support person can help you. Just call 2HELP or email [email protected].
If you are having feedback issues (screeching sounds from your speaker), turn down the gain on your mic unit. If the feedback issues persist or you cannot find a comfortable volume through your speakers, you need to adjust the controls on your actual speaker unit. Be sure you feel comfortable making these adjustments and you are reaching the controls safely. A building custodian or TIS Support person can help you. Just call 2HELP or email [email protected].
Volume Controls
The volume buttons on the right side are for the volume of all inputs. This is the volume for all microphones and the projector connection.
The volume buttons on the right side are for the volume of all inputs. This is the volume for all microphones and the projector connection.
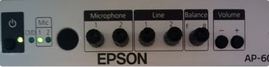
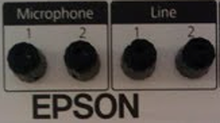
Your speakers have four volume knobs.
Adjust the Microphone 1 volume knob to change the volume of your personal microphone that is on Channel 1. If you're on Channel 2, adjust Microphone 2.
The Line 1 volume controls the audio running to the speakers from your projector through the drop/connection in your room. If you are playing audio through the connection on your wall (the top input on the picture below), adjust this knob to fine tune the volume.
Balance
Adjust the balance if the sound needs to be louder in the back half of your room than it is in the front half. The knob will "click" in the center position if you want your audio to be equal on both halves of your room.
Playing Audio from your computer/audio player
If you want to play audio from your computer or a media player (CDs, MP3s, etc) through your Voice Amplification System, you have two options:
1. Run the audio to the wall connection in your room and through your ceiling mounted projector. See the above instructions on Volume if this doesn't work. You can use the audio cable that comes with your VGA cable.

or
2. Plug in to the side of your mic unit that's labeled "Audio In". This can be very useful.
2. Plug in to the side of your mic unit that's labeled "Audio In". This can be very useful.
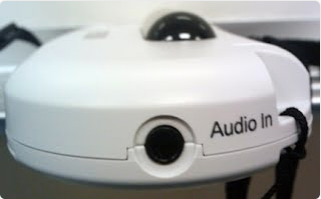
To do this, you will need a cord that looks like this (with a plug-in on each end):
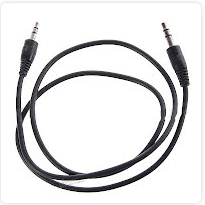
If your building does not have a cord like this, they can be ordered or purchased for about $3-$5 from Target, Wal-Mart, or consumer electronics store like Radio Shack or Best Buy. Amazon also sells them.
Considerations:
To mute yourself temporarily, simply turn off the microphone unit using the power button. The Voice Amplification System does not need time to warm up or cool down, so you can turn off the entire system any time using the remote.
Make sure your speakers are turned off when you leave the classroom and keep the controls and microphone unit away from students if they aren't using it for class. Turn your speakers off at the end of the day.
